Master Data Management
FOR ADMINISTRATORS OR EXTENDED USERS
What is Master Data?
Master Data in Advvy relates to the various lists and fields that can be populated with an organisations terminology.
Adding master data can be performed manually in the system by selecting the +New button on the ribbon or Advvy can supply import templates that can be used to bulk upload your master data.
Rules about Master Data
All Master Data need to have unique “names”. The system will generate unique codes upon creation, but administrators must ensure the naming conventions within each type of Master Data is unique. If there are duplicate named items within the Master Data, users and the system may return errors when trying to find matches or links to the correct data entry.
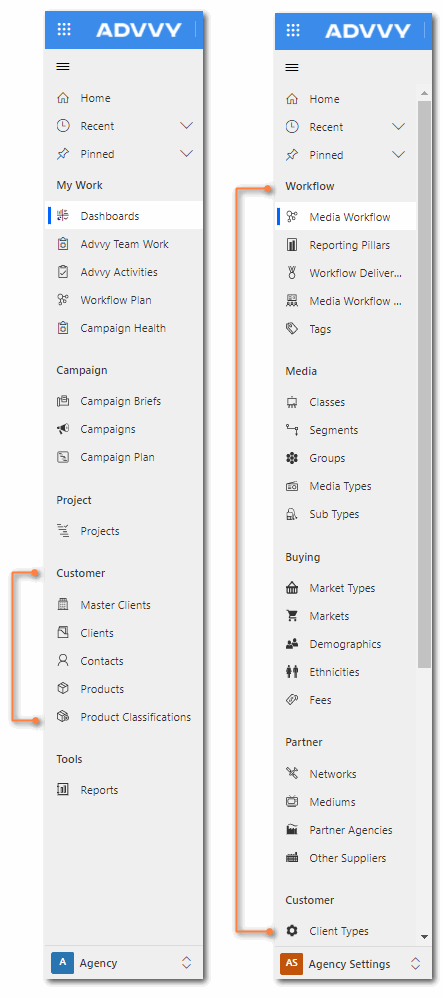
Where is Master Data Located?
Most Master Data is managed in Agency Settings area, but there are additional master data lists managed in the main Advvy area.
How to Add Master Data
Follow these steps to add a new record to your Master Data entity.
- Navigate to the Agency Settings Area. For this example select Network.
- On the ribbon at the top of the screen select +New. A form displays with relevant fields.

- Enter the information on the displayed form, and select Save & Close on the ribbon.
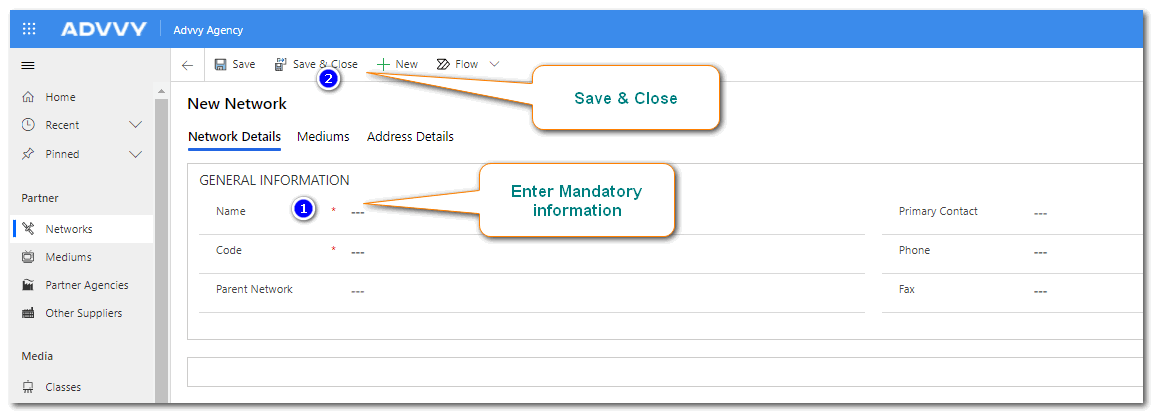
- The new entry is displayed in the view list.
This process can be followed to manually add entries for all of your master data entities.
How to Edit Master Data
- Navigate to the Master Data entity list.
- Click on the name field link next to the entry you wish to edit.
- Make any changes to editable fields – note locked fields cannot be changed.
- Click Save or Save & Close.
To bulk edit an existing list of master data, the following approach is recommended: (Admins only)
- Navigate to the master data entity and display the list view.
- On the ribbon, select to Export to Excel.
- Open the export file in Microsoft Excel and make any necessary edits, such as correcting spelling errors or changing names.
Note: the first 3 columns are hidden and are used as check references, so it’s best to edit entire rows in excel. - Once the Excel file is saved with the updates, follow the Import Data process to overwrite existing information.
The Import Data process also outlines how to add new entries, modify existing entries and remove existing entries.
How to Delete or Deactivate Master Data
In Advvy, all entity records can have a status of Active or Inactive. Making a record “Inactive” doesn’t delete it permanently from the system, it merely retains this record in an “Inactive ” list. Records that have been made “Inactive” can be “Activated” at any time. Some Master Data entities can greatly affect the way Advvy works for all users, so great caution is suggested when deactivating or deleting these entries.
Deleting data is not recommended unless it’s guided by the Advvy Support team. Advvy recommends deactivating records as a first step.
To Deactivate an entity:
- Navigate to the master data entity and display the list view.
- Click at the beginning of the row to place a tick next to the entity, or click on the name link to open the entity form.
- On the ribbon select the ‘Deactivate‘ button. This will remove the entry from the ‘Active’ list. You can find these entries in the ‘Inactive’ view list.
How to Activate an “Inactive” Record
- Navigate to the master data entity and display the list view. It will show ‘Active’ records by default.
- On the entity Title, select the dropdown to display “Inactive” entries.
- Click at the beginning of the row to place a tick next to the entity, or click on the name link to open the entity form.
- On the ribbon select the ‘Activate‘ button. This will display the record in the “Active” list.
More information can be found about master data in the Admin Guide 3: Setting up your Master data.
Master Data Entity Details can be found in the related articles below.