User Management
For Administrators
User Profile Management
Access to the Advvy product begins with the provisioning of a Microsoft Dynamics or Power Apps License within your corporate Microsoft Office 365 account. Users WITHOUT A LICENSE will be UNABLE to access Advvy online.
The provision of a license for the user is up to your IT department. – Please contact them for more info on this.
!! Users must be added to the active directory SECURITY GROUP as part of the Advvy instance.
Once a user has been granted a Microsoft license, Advvy Administrators can then manage the access level of the user and the access they have in the product.
New Licensed users are ready to be granted permissions in Advvy.
All New Users once provisioned with a Microsoft License, will appear in Advvy with a Business Unit set outside the current Advvy Hierarchy. The User Profile needs to be updated to allow the User to access the data within their business unit and teams.
The Advvy User Profile
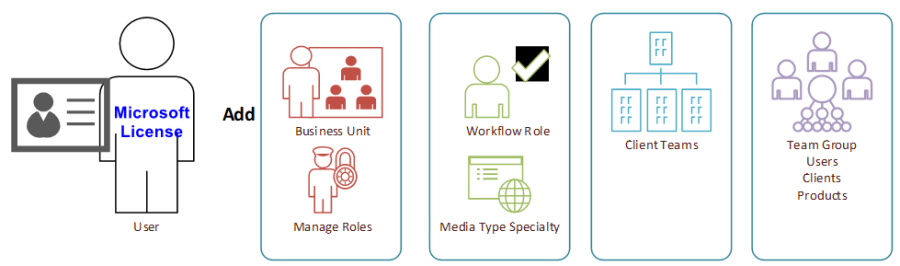
Advvy has several different ways to set up a user profile to control what a user can see and do in the system.
- Business Unit and Security Role Settings
- Assigning Media Workflow Roles
- Assigning Clients
Setting up Licensed Users in Advvy
All New Users, once they are provisioned with a Microsoft License, will automatically appear in Advvy in the Users section in Agency Settings. Double-clicking the user’s name opens their user record.
Remember that the user record controls both security permissions and agency assignments for the user. This directly influences what the user can see in the system (security) and how Advvy manages their record when executing certain functionalities (E.g. workflow allocation functionality). Setting up both security and role assignments are required when first setting up a user.
The following are the minimum requirements needed to set up a new user in Advvy along with their functionalities:
- Assign Branch – Assigns the user to a specific branch (Business Unit)
- Assign Security Role – Sets the user’s security permissions within Advvy.
- Add Media Workflow Roles – Assigns a role to a user.
- Add Client Team membership – Assigns the user to a client team.
Follow the sections below for step-by-step guides to set up users in Advvy.
Assigning a Branch to a User
- Navigate to the user’s user record in the Users section in Agency Setting and double click to open the user’s record
- Inside the user record, click Assign Branch
- The lookup records box will appear, select the Business Unit that the user is a part of
- Click Add
- Notice the Business Unit field in the Organization Information box has been updated
Important: Each time a new branch is assigned to a user, their security role is cleared. Be sure to assign a user their appropriate security role (section 1.2.2) after changing their business unit.
Assigning Security Roles to a User
IMPORTANT: The person assigning security roles to other users must have an admin security role themselves for the below functionality to work. (Advvy Standard Admin, Advvy Standard Admin, Advvy Tracker Admin, Advvy Tracker Branch Admin, System Administrator)
- Navigate to the user’s user record in the Users section in Agency Setting. Double-click to open the user’s record.
- Inside the user record, click the Advvy User – UI drop-down menu located directly under the user’s name.
- Select Advvy User – Admin
pic - Once inside the Advvy User – Admin area, check or uncheck user roles to add or remove that role from the user.
- Click save.
The Advvy Standard User (1) security role is the most common user role in Advvy. Details on other user roles can be found in the Security Roles and Descriptions section below.
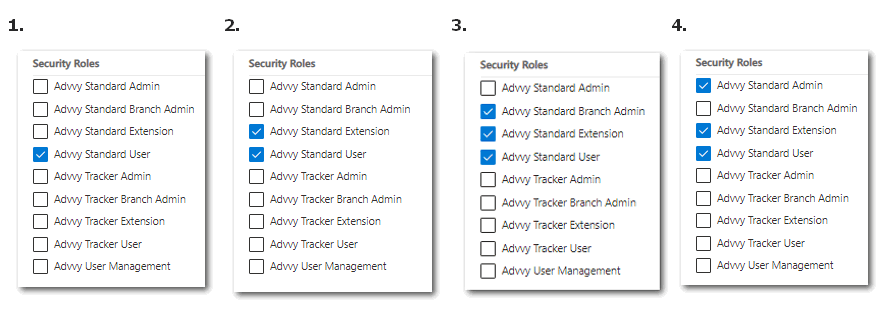
Important: Advvy’s security roles build on one another, so if you want to add additional functionality to a user, you must select the Advvy Standard User (1) role first, then the Advvy Standard Extension (2) Role for the user to receive the correct privileges. See Security Roles for definitions of each role in Advvy.
Assigning Media Workflow Roles
The Media workflow role is a tag used for Task Management.
Users can be assigned multiple workflow roles.
Users can be granted workflow roles either by selecting the Workflow Role and adding the users to the grid or by adding the role into their User Profile.
To assign a media workflow role to a user profile:
- Navigate to the user’s user record in the Users section in Agency Settings. Double click to open the user’s record.
- Click on the Agency Assignments
- Click the Add Existing Media Workflow Role button. The Lookup Records box will appear and if Media Workflow Roles have been uploaded to Advvy they will populate when searched for.
- Search and select the Media Workflow role and then click [Add].
*If Media Workflow Roles have not been created, users can create a new record by clicking +New Record button. See Media Workflow Roles in Workflow Management for more information.
Assigning Clients to Users
When a new user is added to Advvy, they will have no visibility of client campaigns. To provide visibility of Clients and their Campaigns to a User, the User can be added to the Client Team.
Adding a User to a Client can be performed in 3 ways:
- Adding a Client Team to a User Profile (Through User settings)- see below
- Adding a User to a Client Team (Through the Client record)
- Adding a User to a Team Group where multiple clients can be assigned in one step (Through settings Team Groups).
To add a Client team to a User Profile:
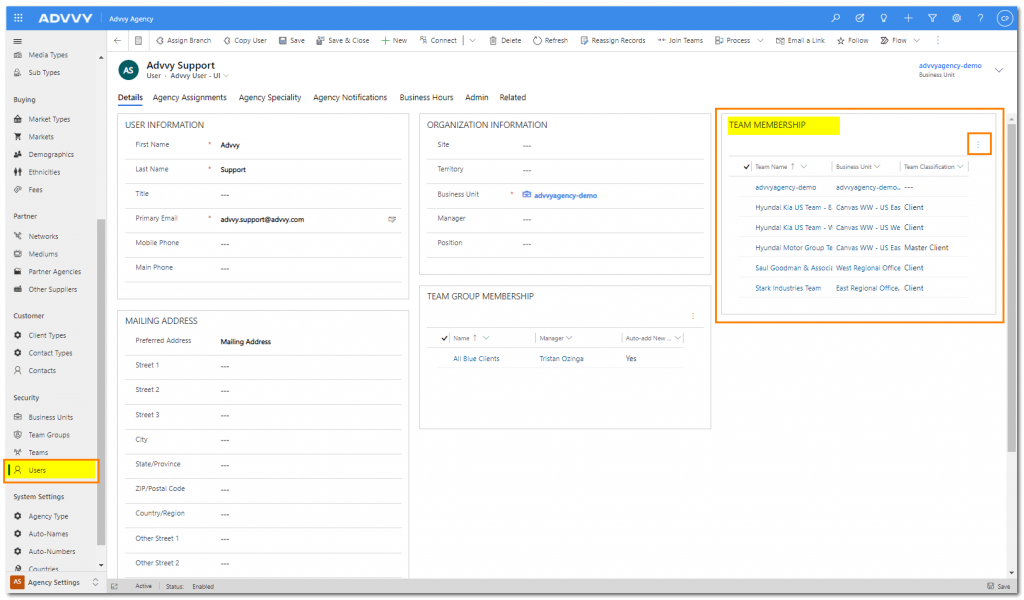
- Navigate to the user’s user record in the Users section in Agency Settings. Double click to open the user’s record.
- In the Team Membership grid, select the … and Add Existing Team
- Select one or more Clients to add to the User Profile and Save
The User will now be able to see the Campaigns related to this client.
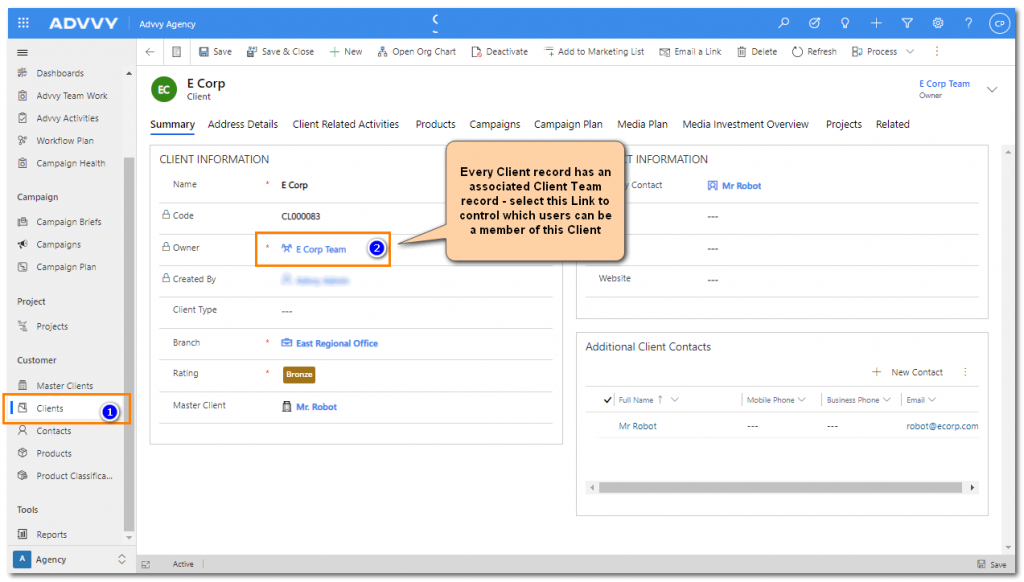
To add a User to a Client Record:
- Navigate to a Client in Agency Area. Double click to open the Client record.
- In the Client Information grid, select the Owner Client Team link. This will display the Client Team page.
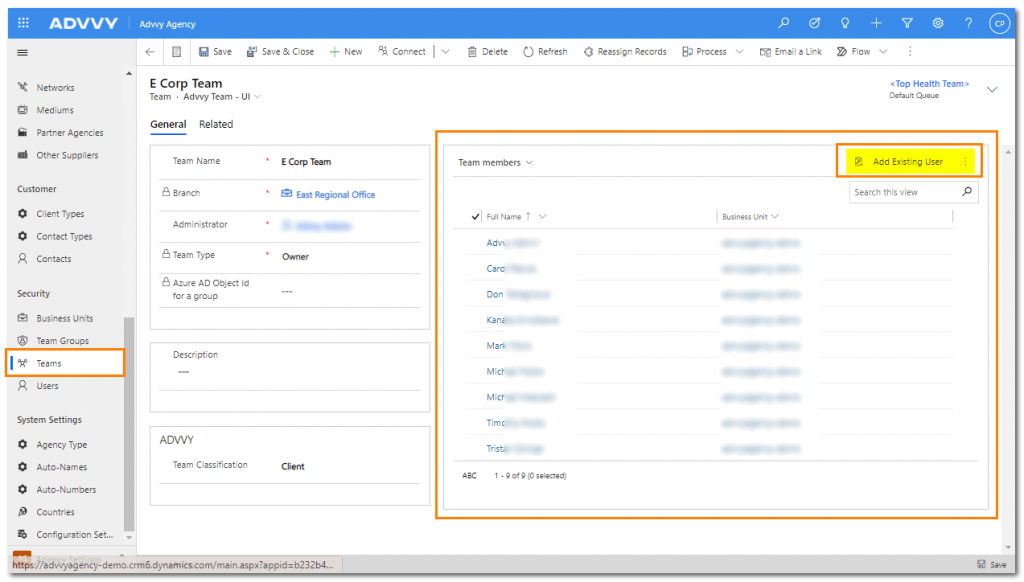
- In the Team members grid click on Add Existing User and select one or more Users to add to the Team and Save
The User will now be able to see the Campaigns related to this client.
To add a User to a Team Group:
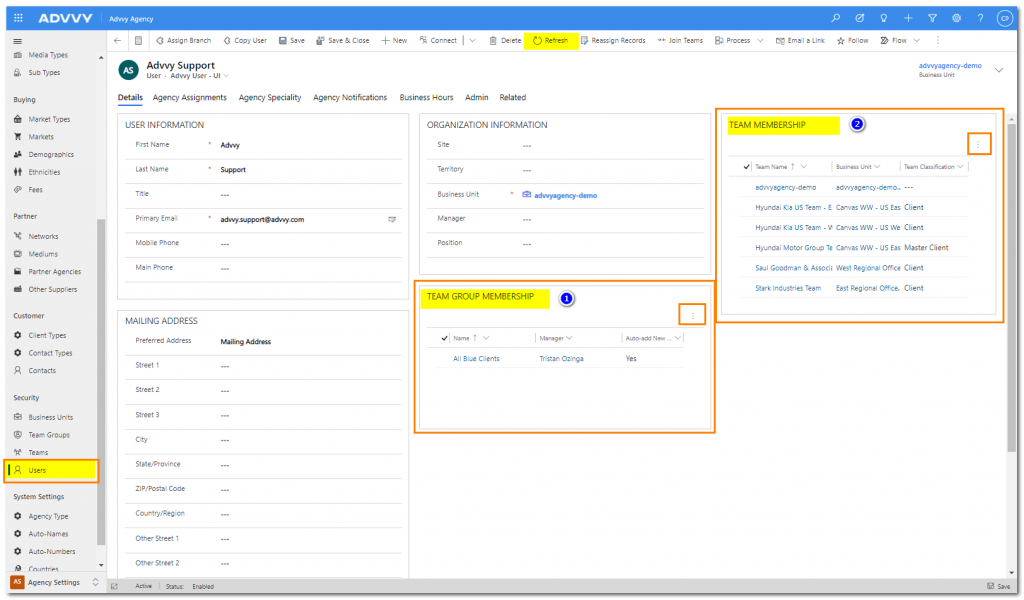
- Navigate to the user’s user record in the Users section in Agency Settings. Double click to open the user’s record.
- In the Team Group Membership grid(1), select the … and Add Existing Team Group
- Select one or more Team Groups to add to the User Profile and Save
- Refresh the Page and the Team Group Client Teams will be added into the Team Membership Grid
The User will now be able to see the Campaigns related to this group of clients.